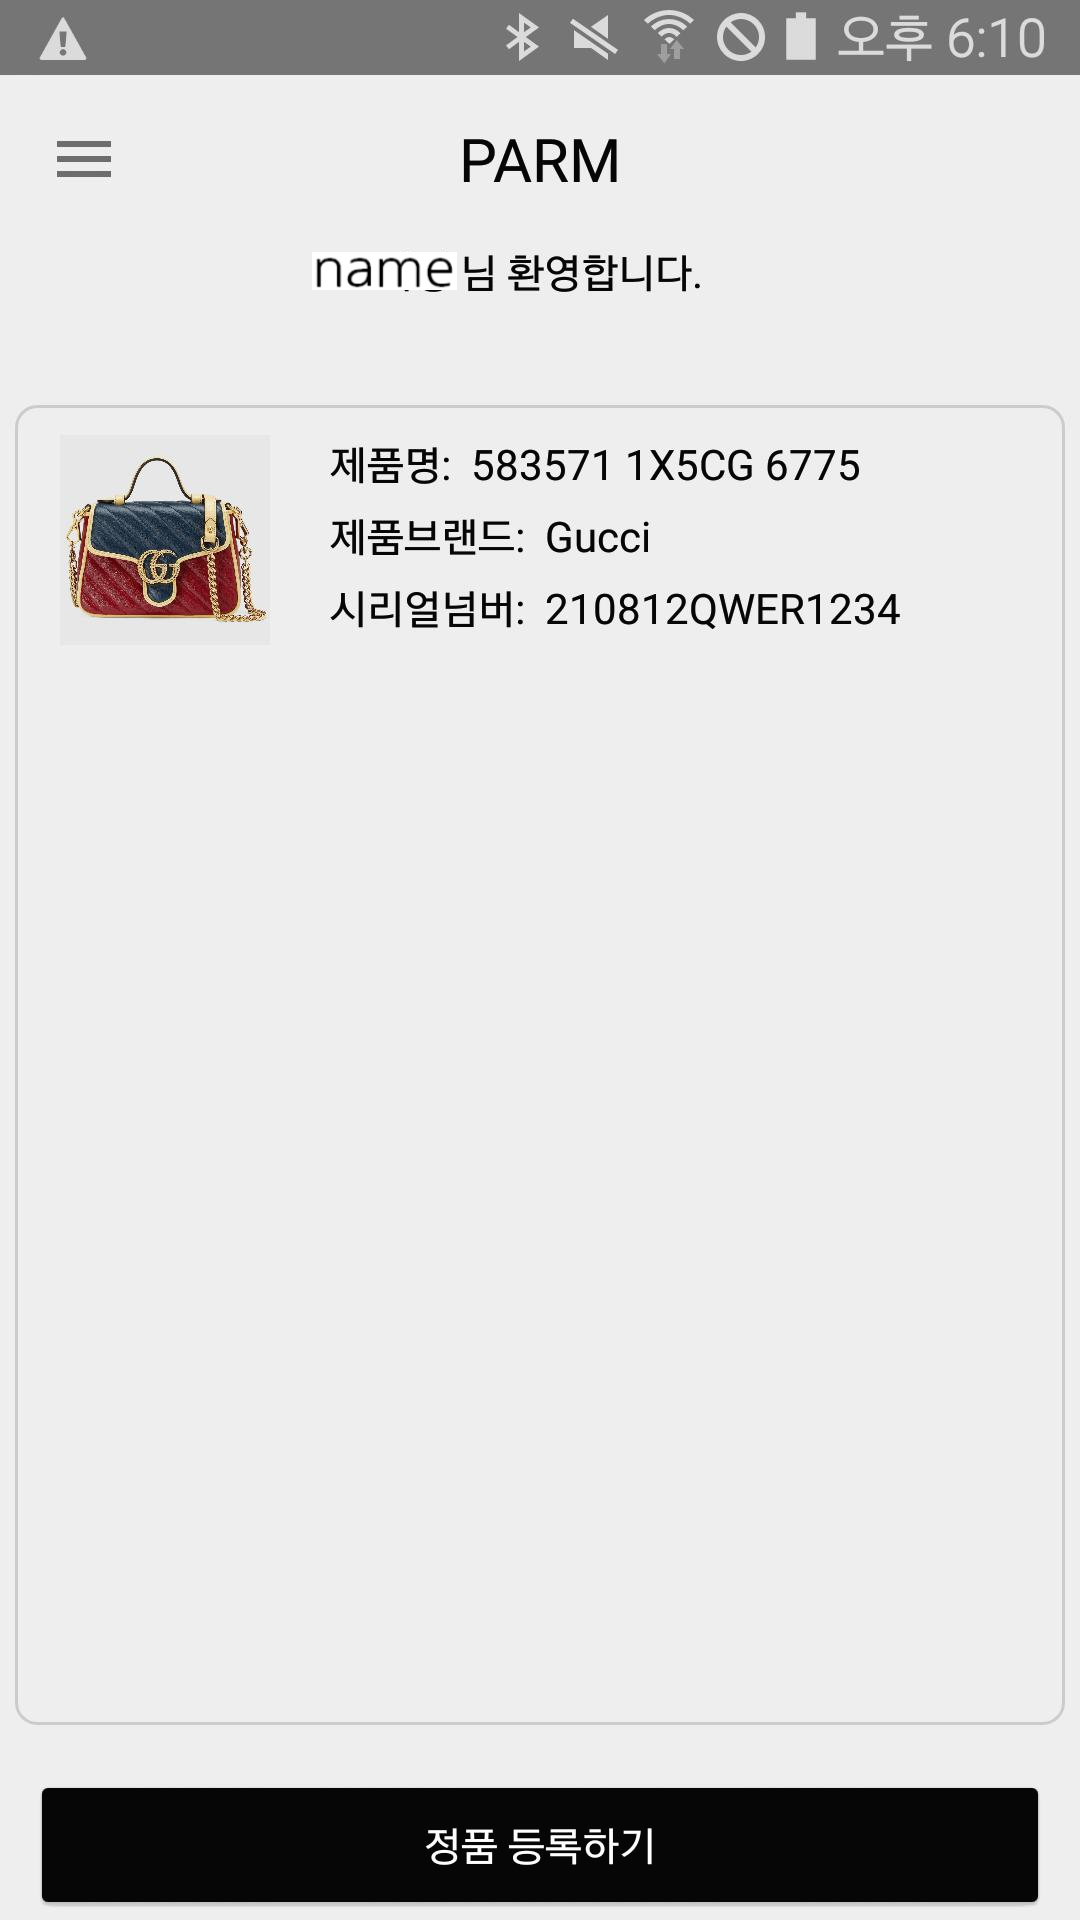
툴바를 만들어서 왼쪽 삼지창을 누르면 메뉴가 뜨도록 하려고 한다.
우선.. 액션바가 아니라 툴바를 사용할것이기 때문에~~!!!
1. manifest에 들어가 ActionBar를 보이지 않게 설정해준다.
AndroidManifest.xml
android:theme="@style/Theme.AppCompat.Light.NoActionBar">
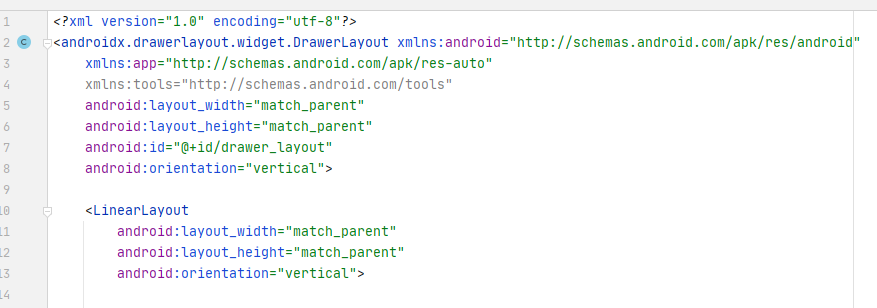
2. 이전까지 LinearLayout을 사용하고 있었는데 이 기능은 drawerlayout을 사용해야 한다.
그래서 맨 위 layout을 drawerlayout으로 바꿔준다.
-> androidx.drawerlayout.widget.DrawerLayout
2-1. 이전에 사용하던 레이아웃이 있다면 drawlayout을 선언한 바로 밑에 선언해준다.

+ drawablelayout의 id를 꼭 설정해준다.
3. 툴바를 만들어준다.
 <!-- toolbar -->
        <androidx.appcompat.widget.Toolbar
            app:layout_constraintTop_toTopOf="parent"
            android:id="@+id/toolbar"
            android:layout_width="match_parent"
            android:layout_height="wrap_content">

            <TextView
                android:layout_width="wrap_content"
                android:layout_height="wrap_content"
                android:layout_gravity="center"
                android:textColor="@color/black"
                android:textSize="20dp"
                android:text="PARM">

            </TextView>

        </androidx.appcompat.widget.Toolbar>
여기서 TextView 안에 text 안에 내용이 툴바에 넣어줄 text이다.
4. navigationView를 선언해준다.
</LinearLayout>

    <com.google.android.material.navigation.NavigationView
        android:id="@+id/nav_view"
        android:layout_width="wrap_content"
        android:layout_height="match_parent"
        android:layout_gravity="start"
        android:fitsSystemWindows="true"
        app:itemTextColor="@color/black"
        app:itemIconTint="@color/black"
        app:menu="@menu/csm_main_menu" />


</androidx.drawerlayout.widget.DrawerLayout>
여기서 drawerlayout 밑에 사용하던 레이아웃으로 감싸주었다면 그 바깥에 선언해줘야한다!
참고로 itemTextColor와 IconTint 부분은 말 그대로 글자색과 아이콘 색을 바꿀 수 있는데 기본 색깔은 회색이다.
근데 자꾸 메뉴를 클릭하면 글자랑 아이콘 색이 흰색으로 변하는 현상이 있어서 black으로 설정해주었다.
4-1. app:menu="@menu/csm_main_menu" 부분으로 메뉴에 넣을 값들을 넣어준다.

res 밑에 menu를 만들어주고 메뉴에 넣을 값을 선언해준다.
csm_main_menu.xml
<?xml version="1.0" encoding="utf-8"?>
<menu xmlns:android="http://schemas.android.com/apk/res/android">

    <item
        android:id="@+id/gucci"
        android:icon="@drawable/gucci"
        android:title="구찌 공식 홈페이지"/>

    <item
        android:id="@+id/chanel"
        android:icon="@drawable/chanel"
        android:title="샤넬 공식 홈페이지"/>

    <item
        android:id="@+id/logout"
        android:icon="@drawable/ic_logout"
        android:title="로그아웃"/>

</menu>

5. class 안에서 선언을 해줄 것이다.
oncreate 안에 선언해준다.
5-1.
//툴바
        Toolbar toolbar = (Toolbar)findViewById(R.id.toolbar);
        setSupportActionBar(toolbar);
        ActionBar actionBar = getSupportActionBar();
        actionBar.setDisplayShowCustomEnabled(true);
        actionBar.setDisplayShowTitleEnabled(false); // 기본 제목을 없애기
        actionBar.setDisplayHomeAsUpEnabled(true); // 뒤로가기 버튼 (왼쪽)
        actionBar.setHomeAsUpIndicator(R.drawable.ic_baseline_menu_24);
actionBar.setHomeAsUpIndicator(R.drawable.ic_baseline_menu_24);
이 부분에서 ic_baseline_menu_24는 삼지창 아이콘이다.
이 아이콘은 drawable -> new -> Vector Asset 을 누르면 원하는 여기서 제공하는 아이콘을 drawable에 넣을 수 있다.
5-2. DrawerLayout 선언
mDrawerLayout = (DrawerLayout) findViewById(R.id.drawer_layout);

        NavigationView navigationView = (NavigationView) findViewById(R.id.nav_view);
        navigationView.setNavigationItemSelectedListener(new NavigationView.OnNavigationItemSelectedListener() {
            @Override
            public boolean onNavigationItemSelected(MenuItem menuItem) {
                menuItem.setChecked(true);
                mDrawerLayout.closeDrawers();

                int id = menuItem.getItemId();
                String title = menuItem.getTitle().toString();

                if(id == R.id.gucci){ // 구찌 홈페이지
                    Intent intent = new Intent(csm_Activity.this, GucciWebView.class);
                    startActivity(intent);
                }
                else if(id == R.id.chanel){  // 샤넬 홈페이지
                    Intent intent = new Intent(csm_Activity.this, ChanelWebView.class);
                    startActivity(intent);
                }
                else if(id == R.id.logout){  // 로그아웃
                    Toast.makeText(csm_Activity.this, "로그아웃", Toast.LENGTH_SHORT).show();
                    Intent intent = new Intent(csm_Activity.this, MainActivity.class);
                    startActivity(intent);
                }

                return true;
            }
        });
여기서 메뉴 item을 눌렀을 때 나타낼 것을 설정해준다.
csm_main_menu.xml에서 선언해준 id값을 기준으로 클릭했을 때 이벤트를 설정해주었다.
메뉴 item을 클릭하면 drawerlayout은 닫아주었다.
+ private DrawerLayout mDrawerLayout; 는 onCreate 밖에서도 사용해야 하므로 클래스 바로 밑에 설정해준다.(5-3)
5-3. 왼쪽 삼지창으로 설정한 버튼을 눌렀을 때 drawerLayout이 펼쳐지도록 설정한다. onCreate 밖에 선언한다.
@Override
    public boolean onOptionsItemSelected(MenuItem item) {
        switch (item.getItemId()){
            case android.R.id.home:{ // 왼쪽 상단 버튼 눌렀을 때
                mDrawerLayout.openDrawer(GravityCompat.START);
                return true;
            }
        }
        return super.onOptionsItemSelected(item);

    }
툴바에서 왼쪽 위를 클릭했을 때 drawerLayout이 펼쳐지게 하는 부분이다.
openDrawer로 설정해준다.
전체 코드
csm_main_menu.xml
<?xml version="1.0" encoding="utf-8"?>
<menu xmlns:android="http://schemas.android.com/apk/res/android">

 <item
        android:id="@+id/gucci"
        android:icon="@drawable/gucci"
        android:title="구찌 공식 홈페이지"/>

    <item
        android:id="@+id/chanel"
        android:icon="@drawable/chanel"
        android:title="샤넬 공식 홈페이지"/>

    <item
        android:id="@+id/logout"
        android:icon="@drawable/ic_logout"
        android:title="로그아웃"/>

</menu>
csm_home.xml
<?xml version="1.0" encoding="utf-8"?>
<androidx.drawerlayout.widget.DrawerLayout xmlns:android="http://schemas.android.com/apk/res/android"
    xmlns:app="http://schemas.android.com/apk/res-auto"
    xmlns:tools="http://schemas.android.com/tools"
    android:layout_width="match_parent"
    android:layout_height="match_parent"
    android:id="@+id/drawer_layout"
    android:orientation="vertical">

    <LinearLayout
        android:layout_width="match_parent"
        android:layout_height="match_parent"
        android:orientation="vertical">

        <!-- toolbar -->
        <androidx.appcompat.widget.Toolbar
            app:layout_constraintTop_toTopOf="parent"
            android:id="@+id/toolbar"
            android:layout_width="match_parent"
            android:layout_height="wrap_content">

            <TextView
                android:layout_width="wrap_content"
                android:layout_height="wrap_content"
                android:layout_gravity="center"
                android:textColor="@color/black"
                android:textSize="20dp"
                android:text="PARM">

            </TextView>

        </androidx.appcompat.widget.Toolbar>


        <!-- "(소비자)님, 환영합니다." -->
        <TextView
            android:id="@+id/csmHi"
            android:layout_width="wrap_content"
            android:layout_height="wrap_content"
            android:layout_marginBottom="30dp"
            android:text="(소비자) 님, 환영합니다."
            android:textColor="@color/black"
            android:layout_gravity="center" />


        <!-- 박스 안 csmGroup[csmImage, csmName, csmAdmin, csmAddress, csmRecent]  -->
        <LinearLayout
            android:layout_width="match_parent"
            android:layout_height="match_parent"
            android:orientation="vertical">

            <androidx.swiperefreshlayout.widget.SwipeRefreshLayout
                android:id="@+id/swipe_layout"
                android:layout_width="match_parent"
                android:layout_height="0dp"
                android:layout_weight="6"
                android:layout_margin="5dp">

            <!-- 버튼  -->
            <androidx.recyclerview.widget.RecyclerView
                android:layout_width="match_parent"
                android:layout_height="0dp"
                android:layout_weight="6"
                android:layout_margin="5dp"
                android:padding="5dp"
                android:background="@drawable/layout_style"
                android:id="@+id/listView_main_list" />

        </androidx.swiperefreshlayout.widget.SwipeRefreshLayout>

            <Button
                android:id="@+id/csmQrButton"
                android:layout_width="match_parent"
                android:layout_height="150px"
                android:layout_gravity="bottom"
                android:layout_marginHorizontal="10dp"
                android:layout_marginTop="10dp"
                android:backgroundTint="#000000"
                android:text="정품 등록하기"
                android:textColor="@color/white" />

        </LinearLayout>
    </LinearLayout>

    <com.google.android.material.navigation.NavigationView
        android:id="@+id/nav_view"
        android:layout_width="wrap_content"
        android:layout_height="match_parent"
        android:layout_gravity="start"
        android:fitsSystemWindows="true"
        app:itemTextColor="@color/black"
        app:itemIconTint="@color/black"
        app:menu="@menu/csm_main_menu" />


</androidx.drawerlayout.widget.DrawerLayout>
csm_Activity.class
public class csm_Activity extends AppCompatActivity implements SwipeRefreshLayout.OnRefreshListener{

    private static String IP_ADDRESS = "IP_ADDRESS";
    private static String TAG = "customer";

    public ArrayList<PersonalData> mArrayList;
    public UserAdapter mAdapter;
    private RecyclerView mRecyclerView;
    private String mJsonString;
    public String id, sserial;
    public String serial_list[] = new String[50];
    boolean check = true;

    SwipeRefreshLayout mSwipeRefreshLayout;

    private IntentIntegrator qrScan;
    private DrawerLayout mDrawerLayout;


    @Override
    protected void onCreate(Bundle savedInstanceState) {
        super.onCreate(savedInstanceState);
        setContentView(R.layout.csm_home);

        //툴바
        Toolbar toolbar = (Toolbar)findViewById(R.id.toolbar);
        setSupportActionBar(toolbar);
        ActionBar actionBar = getSupportActionBar();
        actionBar.setDisplayShowCustomEnabled(true);
        actionBar.setDisplayShowTitleEnabled(false); // 기본 제목을 없애기
        actionBar.setDisplayHomeAsUpEnabled(true); // 뒤로가기 버튼 (왼쪽)
        actionBar.setHomeAsUpIndicator(R.drawable.ic_baseline_menu_24);

        //정보 받아오기
        Intent intent = getIntent();
        String name = intent.getStringExtra("name");
        id = intent.getStringExtra("id");


        TextView hi = (TextView) findViewById(R.id.csmHi);    // 관리자 이름 + 님 환영합니다.
        hi.setText(name + " 님 환영합니다.");

        Button QRscan = (Button) findViewById(R.id.csmQrButton); // QR스캔 버튼

        mRecyclerView = (RecyclerView) findViewById(R.id.listView_main_list);
        mRecyclerView.setLayoutManager(new LinearLayoutManager(this));
        mArrayList = new ArrayList<>();
        mAdapter = new UserAdapter(this, mArrayList);
        mRecyclerView.setAdapter(mAdapter);


        mArrayList.clear();
        mAdapter.notifyDataSetChanged();

        GetData task = new GetData();
        task.execute( "http://" + IP_ADDRESS + ":8080/api/getProduct?userid=" + id, "");

        mSwipeRefreshLayout = (SwipeRefreshLayout) findViewById(R.id.swipe_layout);
        mSwipeRefreshLayout.setOnRefreshListener(this);


        //QR 스캔해서 제품 등록하기
        qrScan = new IntentIntegrator(this);
        QRscan.setOnClickListener(new View.OnClickListener() {
            @Override
            public void onClick(View view) {
                qrScan.setPrompt("Scanning QR code");
                qrScan.setOrientationLocked(false);
                qrScan.initiateScan();
            }
        });

        //listview 클릭 시
        mAdapter.setOnItemClickListener(new UserAdapter.OnItemClickListener() {
            @Override
            public void onItemClick(View v, int position) {

                Intent intent = new Intent(csm_Activity.this, listview_item_Activity.class);
                intent.putExtra("serial", serial_list[position]);
                startActivity(intent);


            }
        });


        mDrawerLayout = (DrawerLayout) findViewById(R.id.drawer_layout);

        NavigationView navigationView = (NavigationView) findViewById(R.id.nav_view);
        navigationView.setNavigationItemSelectedListener(new NavigationView.OnNavigationItemSelectedListener() {
            @Override
            public boolean onNavigationItemSelected(MenuItem menuItem) {
                menuItem.setChecked(true);
                mDrawerLayout.closeDrawers();

                int id = menuItem.getItemId();
                String title = menuItem.getTitle().toString();

                if(id == R.id.gucci){ // 구찌 홈페이지
                    Intent intent = new Intent(csm_Activity.this, GucciWebView.class);
                    startActivity(intent);
                }
                else if(id == R.id.chanel){  // 샤넬 홈페이지
                    Intent intent = new Intent(csm_Activity.this, ChanelWebView.class);
                    startActivity(intent);
                }
                else if(id == R.id.logout){  // 로그아웃
                    Toast.makeText(csm_Activity.this, "로그아웃", Toast.LENGTH_SHORT).show();
                    Intent intent = new Intent(csm_Activity.this, MainActivity.class);
                    startActivity(intent);
                }

                return true;
            }
        });
    }

    @Override
    public boolean onOptionsItemSelected(MenuItem item) {
        switch (item.getItemId()){
            case android.R.id.home:{ // 왼쪽 상단 버튼 눌렀을 때
                mDrawerLayout.openDrawer(GravityCompat.START);
                return true;
            }
        }
        return super.onOptionsItemSelected(item);

    }


    @Override
    public void onRefresh() { // listview swipe 했을 때

        mArrayList.clear();
        mAdapter.notifyDataSetChanged();

        GetData task = new GetData();
        task.execute( "http://" + IP_ADDRESS + ":8080/api/getProduct?userid=" + id, "");


        //새로 고침 완료
        mSwipeRefreshLayout.setRefreshing(false);

    }


    @Override
    protected void onActivityResult(int requestCode, int resultCode, Intent data){
        IntentResult result = IntentIntegrator.parseActivityResult(requestCode, resultCode, data);
        if(result != null){
            if(result.getContents() == null){
                Toast.makeText(csm_Activity.this, "취소", Toast.LENGTH_SHORT).show();
            } else{
                Toast.makeText(csm_Activity.this, "스캔완료!", Toast.LENGTH_SHORT).show();
                try{

                    JSONObject obj = new JSONObject(result.getContents());

                    GetData2 task2 = new GetData2();
                    task2.execute( "http://" + IP_ADDRESS + ":8080/api/getProduct?userid=none", "");


                    sserial = obj.getString("serial");
                    check = true;


                } catch (JSONException e){
                    e.printStackTrace();
                }
            }
        } else{
            super.onActivityResult(requestCode, resultCode, data);
        }
    }

}
완성 화면


기능을 더 넣고싶은데 뭘 넣을지 고민된다....ㅠㅠ
샤워할때마다 생각해봐야지!!
'컴퓨터 > android, ios' 카테고리의 다른 글
| [Android Kotlin] TabLayout과 ViewPager2를 이용해 화면 구현하기 (0) | 2021.12.18 |
|---|---|
| [Android Studio] build\intermediates\runtime_symbol_list\debug\R.txt' : 데이터가 올바르지 않습니다. (0) | 2021.12.16 |
| [Android Studio] SharedPreferences에 로그인 정보 저장, 자동 로그인 (0) | 2021.09.05 |
| [Android Studio] 이미지 저장공간 안쓰고 url로 listview 위 ImageView에 image 연결하기 (0) | 2021.08.28 |
| [Android Studio] 아래로 swipe해서 새로고침 하는 listview 구현하기 (0) | 2021.08.22 |